Cypress User Registration Testing: A Beginner’s Guide to Cypress
In previous article about Cypress setup and first tests we described some of the basics. In this second part of the Cypress tutorial we will continue with creating tests on a simulated environment. This time we will use Cypress for user registration testing. By doing all these tests we will understand the following:
- working with Mocha hooks
- basics of finding elements
- some of the Cypress functions for manipulating elements
- how to check if the server returns a valid response
- aliasing
Let’s start our learning without further ado.
Creating new test for Cypress user registration testing
First thing I will do is to delete the auto-generated tests when we first started Cypress in the previous tutorial along with the first test we created. What we need to do next is to create a new file which will cover this test. We should put this file in new folder named Registration Tests. The name of the new file will be userRegistration.cy.js. The folder structure should look like this now:
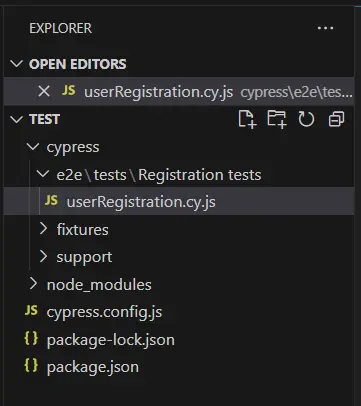
In this file we will first create new describe block and in it the before block. The describe and before are hooks Cypress borrowed from Mocha. Mocha is a powerful test framework running on Node.js. There is a large number of hooks but we will mention those that we will use frequently:
- We use
describeto organize lower level blocks - Block labeled with
beforeruns once before all the other blocks beforeEachblock will be executed every time before anyitblockitblock is usually the block where we put all our testsafterEachgets executed after eachitblockafteris executed once after all theitblocks finish
For now, we will only create the blocks inside the newly created file. If the Visual Studio Code does not offer suggestions when you start typing you should add new file in root Test folder named jsconfig.json and add this line of code in it.
{
  "include": ["./node_modules/cypress", "cypress/**/*.js"]
}
Save the file, ignore the errors it shows and check if the VS Code offers auto suggestions when you type something in the test file. Let’s create all the blocks representing our test cases.
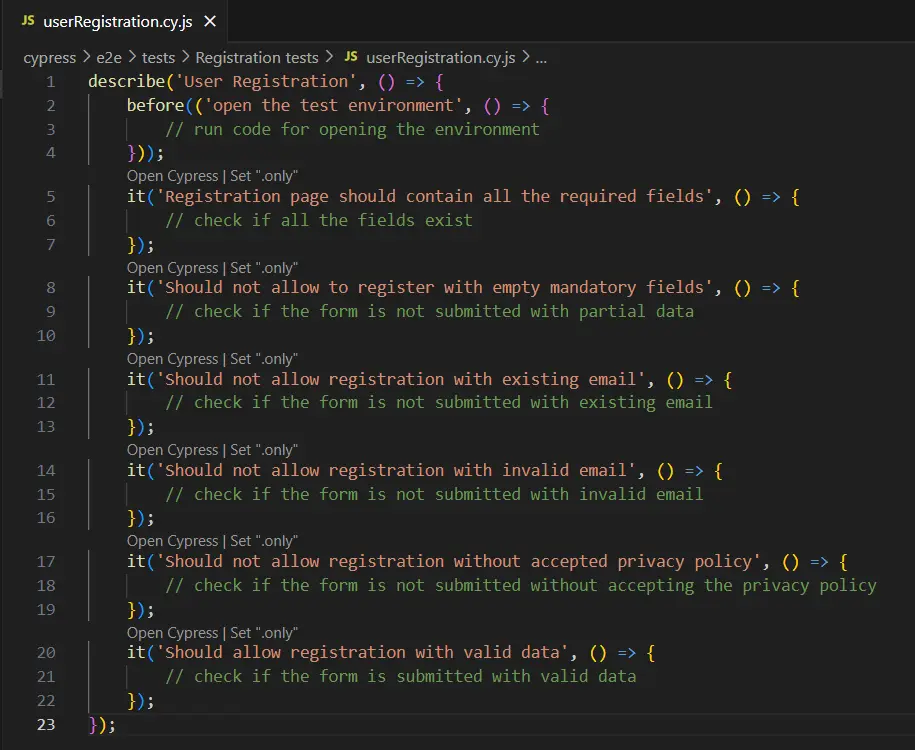
Notice that the name of each it block displays clear intent of the test and what it should assert.
Create before block
As already mentioned in before block we put the code we would like to execute first before any of the other commands. This is a setup of the test. In this block we will prepare for the test by opening the URL of the test page. In our case we need to visit the home page URL, hover over My account button and click on Register button. We will not validate if the page opened by using some assert because we shouldn’t do such check in before block but we will check if the response of the request was successful. For this check we will use intercept and wait commands. The important thing to know is that every Cypress command starts with cy and all the other commands are chained off cy.
Intercept and aliasing
To start we need to open the test environment in our browser and inspect the page. To do that press F12 and your keyboard and click on Network panel. For more information about Network panel check out the in depth article on our blog. Now, we will manually perform the action we would like to replicate using Cypress. After we click on Register button a new GET request is sent to the server. We take the complete URL of this request and put it as an argument in intercept function. After this we put command as and name this action as we like. Cypress call this aliasing. Alias is like a variable in which we store this entire request. These intercept actions are usually written at the top of the block for better visibility. We do not need to write them in any particular order. You can place them anywhere in the block.
Visit URL
After this we add new line of code for visiting https://ecommerce-playground.lambdatest.io/. The command in charge of this is cy.visit and we pass the URL to the test application as an argument.
Hovering an element
Next thing we need to do is to hover an element to make the button for registration appear. There are multiple ways to do this in Cypress, but in our case we can use trigger function which triggers Javascript events like mouseover. To find the element we need to interact with we will use Elements panel in Chrome Dev Tools. The complete command is:
cy.get('a[role="button"]').contains('My account').trigger('mouseover');First we find a button that contains label My account and then we trigger the mouseover event over it. When the Register button appears we click on it.
Waiting for the page to load
If you are familiar with Selenium then you know something about waits. In Cypress the best practice suggest that we should use wait command to wait for the page to load. In this case we actually wait for the alias of the intercepted request and while we get the response we can confirm that it was successful by checking its response status code. The entire before block should look like below:

First test
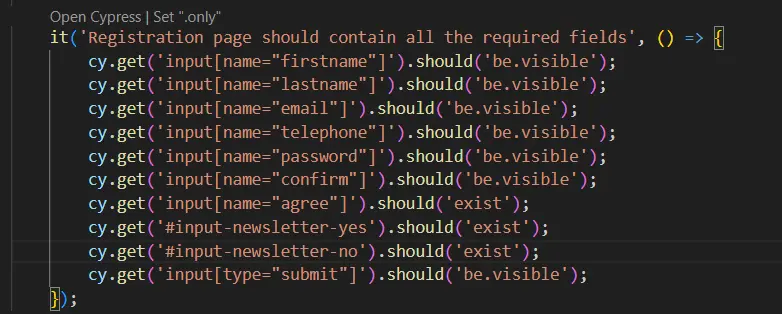
In first test we check if all the elements on the page are visible. The checkbox and radio buttons are custom commands so the HTML elements are not visible. We cannot assert they are visible, but we can check if they exist on the page. For this we will use Mocha assertions performed on specific HTML elements. We find the element we want to interact with again by using Elements panel in Dev Tools and chain the should keyword off it. We do this for each of the elements.
Cypress user registration test with all empty fields
One of the most common test cases to check is the test with trying to send the form with empty mandatory fields. We can perform this test by simple click on a submit button while all the fields are empty and hopefully we will get a validation message preventing the page to send the form. In this test we will explore the concept of chaining assertions using and keyword. It allows us to have multiple assertions on a single element without duplicating the lines of code. Also, we explore the option to find an element by its index with eq keyword and the index of an element as an argument. Indexes start at 0. This is an option when we have multiple elements in HTML with the same attributes and no unique attribute is available.

Don’t allow registration with existing email
In this test of our Cypress user registration testing tutorial we will fill out the form but we will use an email which is linked to a registered user. I have used a fake email address I used to register another user during exploratory testing of this page. This should also trigger validation and stop the page to send the form. In this test we learn how to type text into fields on the page. We use Cypress type command for this action and we also use a new command for checking off the checkbox for privacy policy. Cypress recommends to use check command for this. Since checkbox is a custom command and the HTML element is hidden we need to pass {force: true} as an argument to force clicking on a hidden element. The result of this test should be an alert message that the email is already registered.

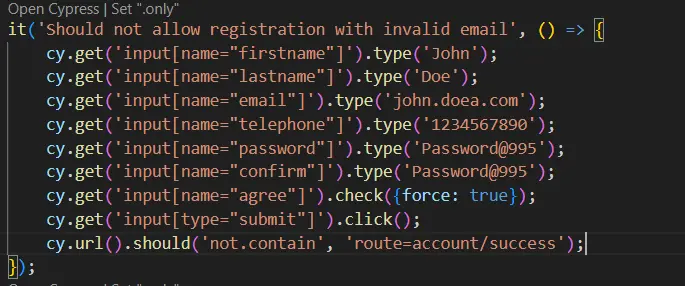
Checking registration with invalid email address
This test is quite similar to the above and we will mostly copy the same steps except for the assert which should check for a different message. Why are we spending time on this in this basic tutorial? When I was a junior QA engineer my aim was to do so much in as little tests as possible. I would set up loops, conditional logic, switches, anything just to avoid writing additional code. In this test and the above I could have used the same logic for populating the fields and just add an if statement which would check in one case for existing email alert message and in the other case for invalid email.
We should avoid conditional logic in test code. There are valid test cases when we could use it but this is not one of them. In this case, it is better to split the logic, retain readability at a cost of repeating a few lines of code. Plus, we might be able to do something later to reduce the repeating of the code but for now we will continue like this.
For this test we cannot quite check the message that appears when the email address is invalid. It is an in-built PHP message which is a function of the browser. We should not try to test the functionality of the browser but our application. To check if the page sends the form with invalid email we can assert the URL. The URL contains route=account/success when the registration is successful. We should assert that the URL does not contain this string after clicking submit which would mean that we stayed on the same page.
Exploring negative asserts
In the following test we assert that the page will not send the form when privacy policy is not checked off. We add a new skill by exploring the Mocha negative assertions. Try typing the command for finding the checkbox followed by should command and start the assertion argument with ‘not’. You will see a list of all the possibilities for negative assertions. In our case we need not.be.checked.

Happy path test
Finally we will go through happy path test in this Cypress user registration testing tutorial. For happy path we complete the form with all the valid information and submit it. We will validate the page and its content to make sure that everything works fine.

Running the Cypress user registration test
If you remember from the previous article in the series, we start the Cypress runner by typing npx cypress open in the terminal window. Then we select E2E tests and select a browser to run the test. Then our test specification should be visible. When we click on it the test will start. However, the Cypress does clean up after every it block which means that every block should start from the very beginning. In our case, first test will run without problems and others will fail. This can be solved in two ways, by adding testIsolation: false in cypress.config file or by changing our before block to beforeEach.
const { defineConfig } = require("cypress");

module.exports = defineConfig({
  e2e: {
    setupNodeEvents(on, config) {
      // implement node event listeners here
    },
    testIsolation: false
  },
});
The best practice says that we should keep our test isolated and that is the option we will choose. Just rename the before block to beforeEach and try to run the tests now. All the tests should pass.
Summary
In this Cypress user registration testing tutorial we have touched many important topics. Although this list of test cases is not exhaustive it is designed to cover broad range of different topics. Just to mention some of them: aliasing; waiting for the server to return the response; type, check, trigger and hover commands; Mocha hooks, assertions and negative assertions. This by itself is enough for a small scale testing even though we haven’t discussed yet the Page Object Model in Cypress. In one of the next articles we will expand our tests with reusable custom commands, POM and setup of baseUrl.

